Identity and Access Management, Uncategorized

MIM 2016 and Source Control

My recent engagement has seen me work with all things MIM 2016. Putting configurations into source control is one of them.

To start this article, it baffles me most when people are integrating a product within a solution and have decided to ignore anything related to source control! It hurts right in the middle of the head when people are too busy getting a solution going, promoting to next stage or making more configurations and not worrying about keeping a copy of their previous iteration of success.

I havent done anything special here but only collated a bunch of articles and some scripts to put together a process which ensures that every night when devs knock off, they have a copy of their work in git! Everytime they make a breaking change they can go to git and restore their work by importing previous days changes.

My main focus here is the MIM configurations, not so much the database as that is covered easily by setting up daily sql job for backup or your VM snapshots.

The scripts which I have gathered cover the following

  • Config
    • Service
      • Portal
      • Policy
      • Schema
    • Sync
      • MA – Management Agent
      • MV—Metaverse
      • Extensions

I have also put together a handy script which runs all profiles at once. This was done by exporting profile as code using the sync manager tool and then running them one after the other as recommended on MS Docs. See repo below for the code, note this can be done either in Powershell or .NET console app. I chose the latter.

I also configured an Azure pipeline to execute all of this remotely using the Remote powershell on target machine.

Identity and Access Management, Uncategorized

MIM 2016 and installation journey

image11-300x169


Yes! The title says it all. I recently jumped onto a project where I have ran into Microsoft Identity Manager(MIM) 2016. Its been only few days and wow it has been fun!! Anyways, I decided to learn this product on the go and what a better way to start other than installing it yourself within an on premise Virtual Machine(VM). My couple of days effort came to success at 1 am when I finally saw the ray of sunshine, yes the MIM portal.

I will be adding all the things i went through while installing MIM 2016 from scratch and hopefully update this soon and with more things I come across going forward

My journey to installing MIM 2016 was carried mostly using the 2 blogs which are these but then I went around looking for answers for installation related errors. Weirdly enough I was switching between the two whenever I got stuck on any step.

Steps performed:

  • Setup Hyper-V with 2 Windows Server 2012 R2.
  • 1 VM to be used as AD and Domain Controller. 2nd VM will host all things MIM which include SqlServer, bare bones SharePoint 2016, MIM portal, Sync Service and Manager, Lithnet REST Api portal and lastly the extensions required such as MIMWal. You could put sql server on a different box but that’s too much work for a lab env anyway.
  • 1 VM will be running AD and will be promoted to DC as well so once your VM is setup, do below steps
    • Using the server manager add AD features
    • Enable dhcp server and dns roles as well.
    • Dhcp server here is optional since we only have 2 VMs so theres not much of setup. VM acting as DC will have a dns server and a static IP so the second VM just has to point to the 1st VM. Note the everytime you restart DC vm or turn it off, the IP will change. There are proper ways to implement this but since this is a MIM lab experiment so I didnt bother much on this.
    • You will also require asp.net features since portal is a .net website.
  • After installing AD, restart is required so push that button.
  • Assuming AD feature installation went well and you are back on after restart, now is the time to promote it to DC
  • Make sure you give your VM a static IP since it will be the DNS server for other VM
  • Time to setup accounts that will be used by MIM and its installation process. Key thing to note is to keep admin and service accounts separate
  • Key accounts to be setup are for sharepoint admin, sql server and a bunch of MIM accounts mainly for service and install.
  • Next step is to install SQL Server. This isn’t much of a deal since its a basic installation and doesn’t require any fancy configuration/features apart from the standard ones.
  • Install reporting if you are going to be using some report generation. Note that can be done later as well.
  • Next up is sharepoint installation. Heads up on this one as this can get very very tricky when configuring sharepoint and also when installing the pre-requisites
  • Installing sharepoint 2016 Sp1
    • Pre-Requisites: Sharepoint installation requires you to go and install a bunch of pre-reqs before it does the complete installation. One option is you are connected to the internet and the prereqs installer will download and install all the required things itself and keep going. 2nd option, the tedious one is that you download all the bits yourself, install them and let the pre-reqs run to determine if it is installed correctly. For some odd reason I decided to take the 2nd option and make my life interesting!!
    • The approach I took was basically run the pre-requisite installer, let it fail on a step and then go fetch the component that was missing. There is a link to few blogs which mentions all the installers needed.
    • Here i would like to mention that I was absolutely stumped with the famous “step 3/10” installation error where it just didn’t like the component that i had installed. Main reason behind it was the missing pre-requisite for the pre-requisite that was been installed. I scoured through heaps and heaps of blogs for this. I will be posting all the necessary articles and blogs used in this at the very bottom.
    • I have also noticed that the app service fabric installation can be a real pain so check the link here (Sharepoint configuration Appfabric error 1603) which helps you through. Basically its a command line install however it points to the location of app fabric installer. I did this because it kept failing in my case as it was unable to download it in the absence of internet 
    • Configuration:Configuration of sharepoint farm is done via a wizard where it sets up all the necessary bits and the databases required. There are links below that will help with it.
    • Note if you are using a instance on a port and run into an error, the following link will help you get going. Basically on some environments we are restricted and can only use the given port and instance (Invalid Loopback address error), (Invalid Loopback Error)
    • During my configuration process it failed mostly on step 3 of the process which can be due to multiple reasons
      • Appfabric not installed properly
      • Microsoft Information Control client 2.1 not installed properly 
      • datatypes not present i.e. WCF data services 5.6(reinstall required)
      • All the above issues can be tabled using the command line however the offline installer needs to be present. It fails most of the time due to lack of connectivity to the internet and not been able to download and install
      •  
    • It also failed once on step 7 for me and I figured it was due to sharepoint timer service not running, starting the service and running configuration wizard again resolved it for me.  
    • Key thing to note(which I understand) is that we are only using SharePoint as a placeholder for MIM portal so most of the time(95%) we are accepting defaults for the configuration wizard.
  • Installing MIM Synchronisation service
    • Run the setup as admin
    • Make sure you have admin accounts handy
    • Make sure the service account MIM Sync one has got logon rights
    • Follow the wizard prompts and it should go through easily 
  • Installing MIM Portal and Service
    • I followed the Lokna steps as mentioned earlier in my post and it went fine. However I have had to install multiple times by now in different environments so I did face a few issues
    • Use the correct accounts for MIM Service, MIM Server and ensure there are absolutely no typos
    • Ensure SQL server agent is running
    • Ensure MIM Sync service is running
    • Ensure SVC accounts have got logon rights
    • The error which stumped me for more than 2 days was the error I got right at the end, see below:
      portal and service error 

      If you start looking into this error, you can go into depths of getting nowhere. On surface it looks like a permissions error, event logs show that there is an incorrect account, incorrect hostname, sharepoint ULS logs tell you it is User profile service failing and so on.

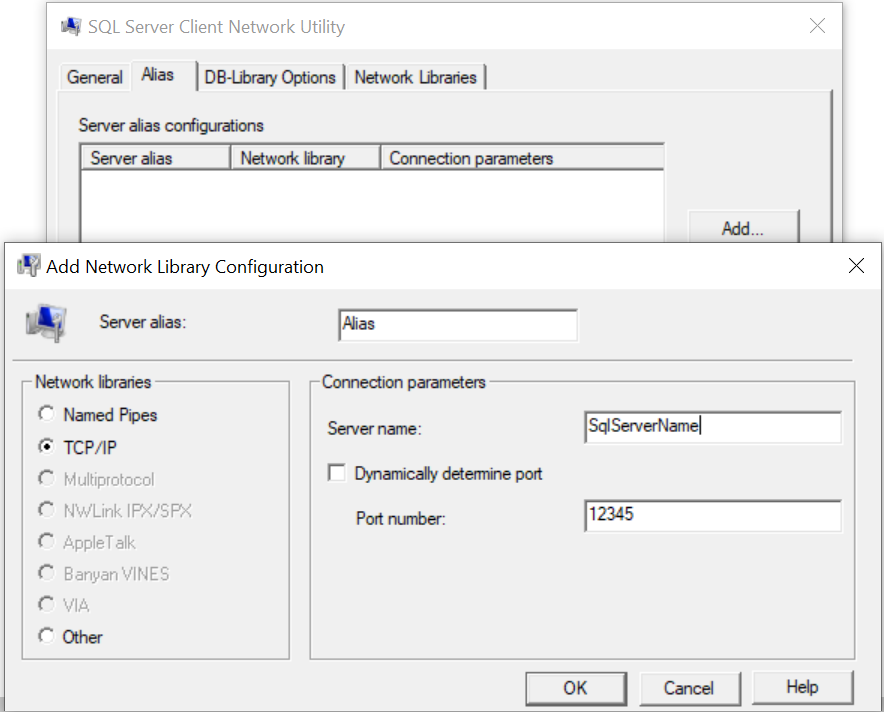
      Anyhow, eventually got past it by using a SQL alias. YES!!!. the environment i was installing this on had  SQL server installed on a port. For some reason MIM portal and service setup was not liking it and as a result we had to add a sql alias and then use that alias in the sql server step of the setup. 3 different articles pointing to the issue. I hd to search this retrospectively after fixing the issue.
    • SQL alias can be setup by launching sql cli tool from the server that you are installing this on.
      • Go to “C:\Windows\System32\CLIConfig.exe”

      • set sql alias
    • Setup will also fail if it cannot find sql server
    • One installed, make sure you can actually navigate to the portal and click on a few pages too.
  • MIMWAL Installation
    • These are libraries provided by amazing Lithnet guys which baiscally help productivity by providing some workflow activity libraries.
    • The mimwal installation is quite straight forward and their wiki is on spot
    • GACUTIL error: However, some of might get stuck onto a error/warning related to GACUTIL version. In short make sure the gautil.exe config file version matches the one in the solutionoutput\src folder. i used 3.5.30729.1. Basically it should match the .net CLR version you have on machine.
  • Lithnet REST API installation
    • Standard IIS API installation here  Lithnet REST API
    • Make sure the role group added in step 7 is also added to domain, i’ve seen people skipping it
    • REST API can be tested using PostMan, SOAP UI tool or fiddler.
    •